
How to Shape Model - Part 1 - Introduction
Published:
In this series, I’ll show you how to get from a set of 3d meshes to a 3D statistical shape model. So let’s get right into it!
Video walkthrough of the blogpost:

This is the first tutorial in a series on how to create statistical shape models.
In short, a statistical shape model captures the statistical variability in a set of object. Usually the set of objects are from the same shape class, so e.g. we could measure the statistics of hand variability in one model and head variability in another model, but we typically do not combine this into one model.
Let’s start out by looking at an example of vertebrae shapes.
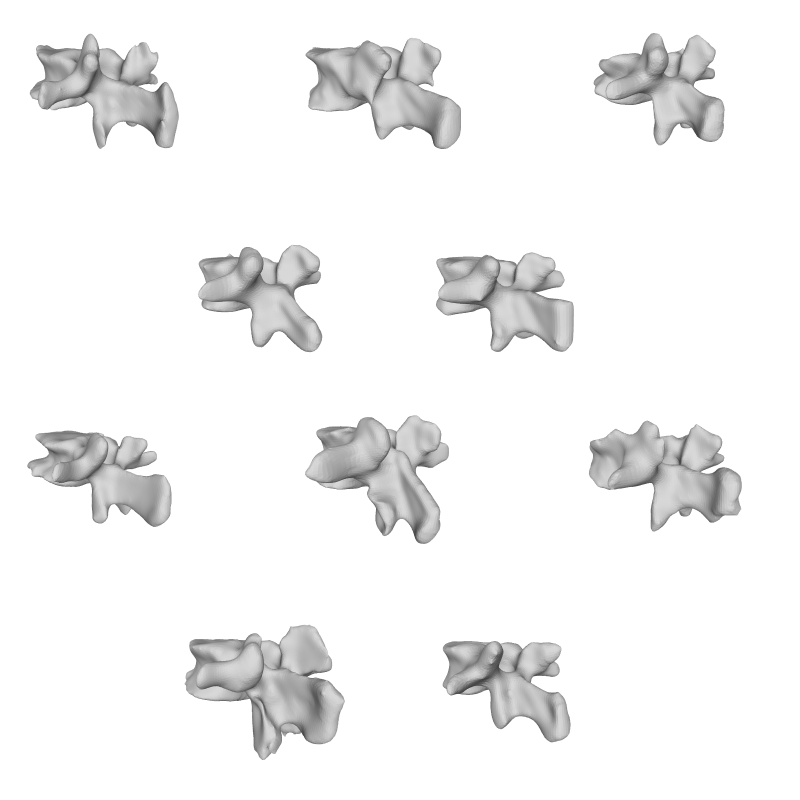
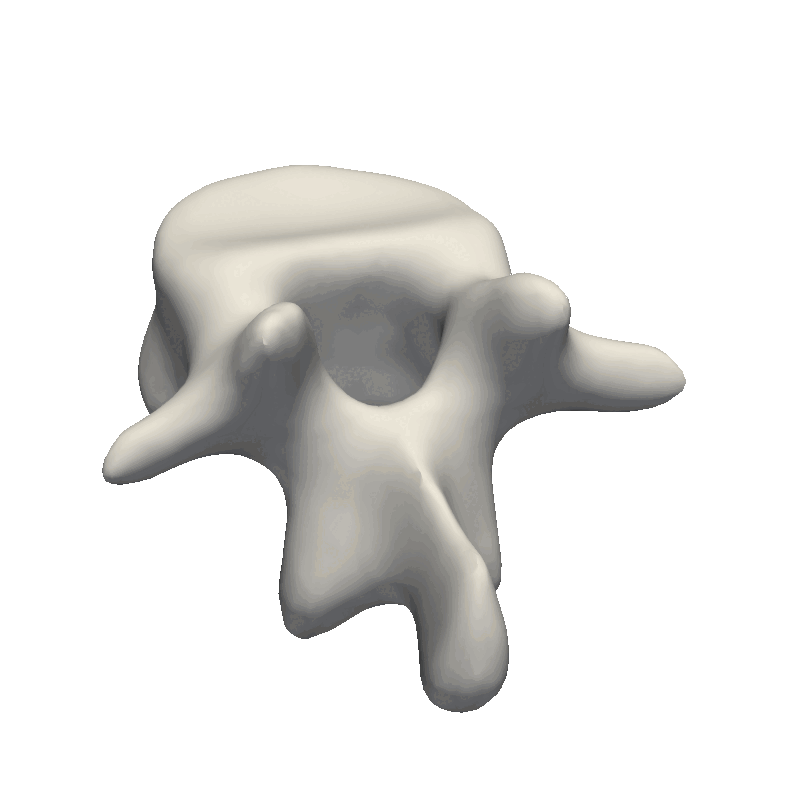
Here we visually inspect an already created statistical shape model. We see that each of the components shows some variability in the geometry. We can also randomly set all the parameters in the model to create a new novel instance.
In my previous video, I already showed some use cases of statistical shape models - so if you are still not sure whether this is for you, have a look at the demo applications linked in the description.
The code for creating such a model is straightforward. So let’s switch to an IDE and get typing. For the coding part, I’ll be using the Scala command line interface, or Scala-CLI for short. I will use the SCALA programming language and the Scalismo library for all shape model related stuff. I’ll use VS code as my development environment.
First install scala-cli if you haven’t already, use scala-cli —version to check your system version. It needs to be at least version 1.x.
Either start a blank project by creating an empty folder or clone the how-to-shape-model repo from github. This repo also contains the data that I’ll be using in this tutorial series. CD into the folder, now we can execute the scala code from the terminal using scala-cli project.scala src/main.scala
Alternatively, we can open up the project in VS code. We just need to initialize the folder we are in using scala-cli ide-setup . Then open vs code with code .
The scala version that we use and the external libraries we will be using are specified in the project.scala file
//> using scala "3.3"
//> using dep "ch.unibas.cs.gravis::scalismo-ui:1.0-RC1"
//> using dep "ch.unibas.cs.gravis::gingr:1.0-RC1"
We will use the newer Scala 3 format and stick to the modern Python-like styling with indentation instead of curly brackets.
Now, let’s load in the data. The data is stored in the data folder folder in .PLY format. We need to specify one of the meshes as the reference mesh. In The one of the next tutorials, I’ll will go over good practices of choosing this mesh. For now, a random one can be chosen.
val dataDir = new File("data/vertebrae/")
val dataFolder = new File(dataDir, "registered")
val meshes = dataFolder.listFiles().filter(_.getName.endsWith(".ply")).map(MeshIO.readMesh(_).get).toIndexedSeq
val ref = meshes.head

val dataCollection = DataCollection.fromTriangleMesh3DSequence(ref, meshes)
val dataCollectionAligned = DataCollection.gpa(dataCollection) // OPTIONAL: Generalized Procrustes analysis
val ssm = PointDistributionModel.createUsingPCA(dataCollectionAligned)
val ui = ScalismoUI()
ui.show(ssm, "ssm")
And that’s basically all there is to it. Now you might ask why I would need a whole tutorial series to explain this simple method that only takes up a few lines of code. The reason for this is the requirement that these meshes need to be in point correspondence with one another. Before explaining this phenomenon, let’s try to build a model from meshes that are not in point correspondence.
Instead of using the registered folder, let’s instead use the raw folder. And let’s also print out the number of vertices in each mesh:
...
val dataFolder = new File(dir, "raw")
meshes.foreach(_.pointSet.numberOfPoints)
...
If we are lucky to compute the model, we will end up with a model, where the deformations make little to no sense. Alternatively, you will get an error regarding the number of points in the meshes that were used. This will happen in the meshes in the dataset have a different number of vertices than the reference mesh.
By printing out the number of points in each mesh, we clearly see that each mesh has a different number of points.
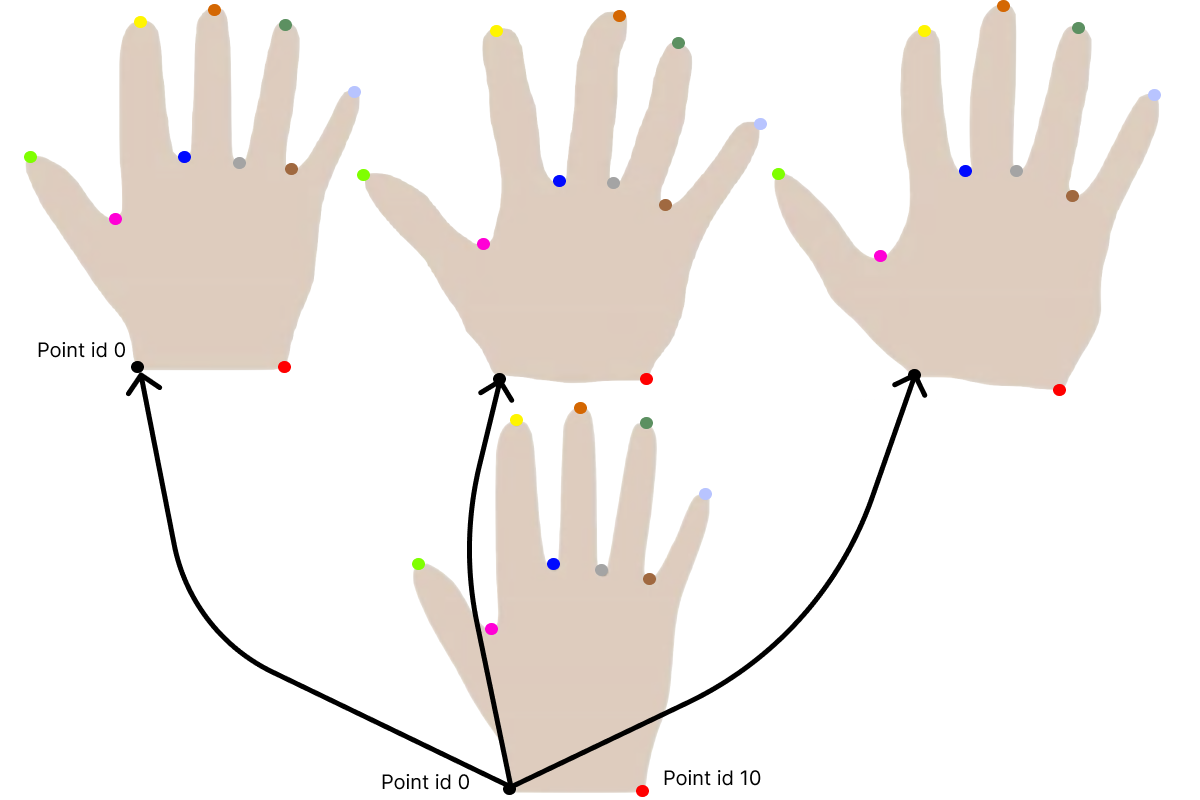
Let’s have a closer look at our meshes. For this, let’s visualize the same point ID on all the meshes in our dataset. In the dataset that works, we see that the same point ID corresponds to the same anatomical point on all the meshes.
val dataDir = new File("data/vertebrae/")
val dataFolder = new File(dataDir, "aligned")

val ui = ScalismoUI()
val pointId = PointId(1000)

dataFolder.listFiles().filter(_.getName.endsWith(".ply")).foreach { f =>
  val mesh = MeshIO.readMesh(f).get
  val lm = Seq(Landmark3D(f.getName, mesh.pointSet.point(pointId)))
  ui.show(mesh, f.getName)
  ui.show(lm, "landmarks")
}
If we do the same for the aligned meshes, we see that this isn’t the case.
Let’s look at a simple case of 3 hands1. What the shape model contains is essentially the mean deformation and variance for each point in the mesh - and of course the covariance to neighbouring points. So in the case of the hands, we will find the mean hand size as well as the variability at each point. The corresponding points are here visualized with colors, so the same point color is located at the same anatomical point on each hand.
When meshes are extracted from images e.g. by using the marching cubes algorithm or by scanning an object, they will not by default be in point correspondence. They will rarely have the same number of points. For this, we can perform non-rigid registration between a reference mesh and all the meshes in our dataset to obtain this property. This is also often referred to as fitting.
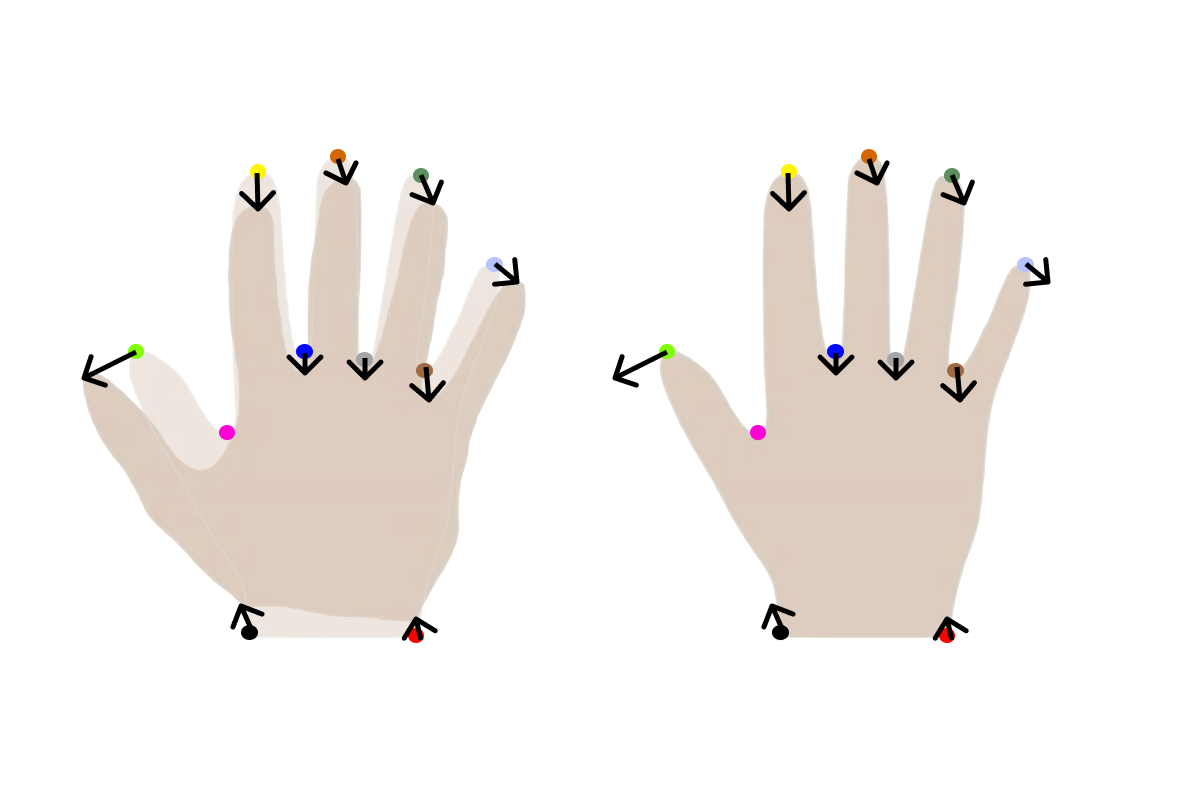
A simple way to explain this is that we choose 1 reference mesh and we then find a deformation field that deforms the reference mesh to approximate each of the meshes in the dataset. As an example, we can overlay two hands and show the deformation needed to warp one hand into the other hand on the 11 given points.
In practise, our shapes will not only be discretized to a few points, but instead consist of thousands or even millions of points to more accurately approximate the surface.
Each of the meshes in the dataset will in other words get the same point structure as the reference mesh, which is why it is important to choose a good reference mesh.
For this tutorial series, we will use a shape dataset of vertices from the vertebrae segmentation challenge at MICCAI (VerSe: Large Scale Vertebrae Segmentation Challenge 2020). For simplicity, I’ve already extracted the mesh from 10 of the segmentation masks and added those to my repository which I have linked in the description.
To run all of the examples shown in this and future tutorials, you just need to execute all the Scala scripts in the prepare_data folder one by one as mentioned in the readme file of the repository.
In the following videos we will go over:
- How to rigidly align the mesh data to simplify the non-rigid registration.
- How to choose or design a reference mesh.
- How to choose the space of possible deformations that the reference mesh can undergo.
- How to use a deformable model for non-rigid registration.
And then extra videos, not specifically on building models are
- How to evaluate and compare shape models
- Different ways to visualize statistical shape models
Hands from Shape modeling course ↩