
How to Shape Model - Part 5 - Model fitting (non-rigid registration)
Published:
In this tutorial, I’ll show you how to use the deformable model that we created to establish correspondence between meshes.
Video walkthrough of the blogpost:

This is the fifth tutorial in the series on how to create statistical shape models.
In this tutorial, we’ll first manually code up a model fitting function to understand all the aspects of what goes into non-rigid registration using the Gaussian Processes and the Scalismo library.
At first, let’s load in a model and a target mesh. Before doing so, be sure to have executed steps 1 and 2 in the src/prepare_data folder as this will first align all our target data and create the model to use.
val dataDir = new File("data/vertebrae/")
val gpmmFile = new File(dataDir, "gpmm.h5.json")
val lmsFile = new File(dataDir, "ref_20.json")
val gpmm = StatisticalModelIO.readStatisticalTriangleMeshModel3D(gpmmFile).get
val lms = LandmarkIO.readLandmarksJson[_3D](lmsFile).get
val targetMesh = MeshIO.readMesh(new File(dataDir, "aligned/sub-verse010_segment_20.ply")).get
val targetLms = LandmarkIO.readLandmarksJson[_3D](new File(dataDir, "aligned/sub-verse010_segment_20.json")).get
val ui = ScalismoUI()
val modelGroup = ui.createGroup("modelGroup")
val targetGroup = ui.createGroup("targetGroup")
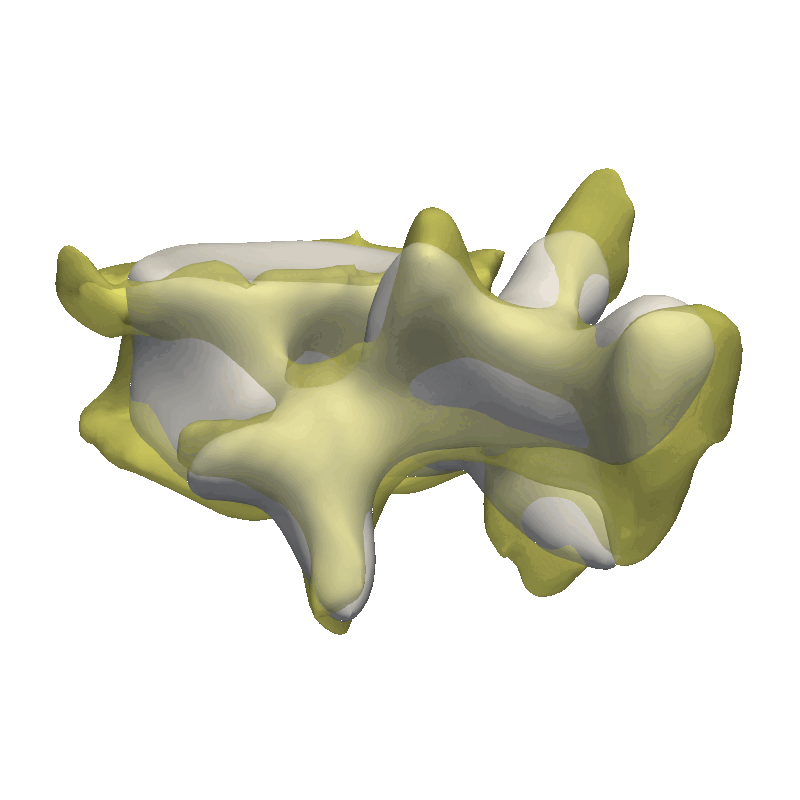
ui.show(modelGroup, gpmm, "gpmm")
ui.show(targetGroup, targetMesh, "target")
Since the target data in this example is very noisy, our goal is not to do a perfect fit, but instead to capture the overall size of the target data. Since we have landmark points available both for the model and the target mesh, we can start out trying to “fit” our model to these landmark points.
val lmsData = lms.zip(targetLms).map{ case(lm1, lm2) => (gpmm.reference.pointSet.findClosestPoint(lm1.point).id, lm2.point)}.toIndexedSeq
val lmPosterior = gpmm.posterior(lmsData, 1.0)
val lmFit = lmPosterior.mean
For some applications, this might be good enough. We can even continue adding landmarks to get the surfaces closer and closer together. You might also want to play around with the uncertainty value when calculating the posterior, this value should be seen as the uncertainty of the landmark observation.
Instead of adding more landmarks, we want to find the “corresponding points” automatically. To do so, we will implement a form of iterative closest point (ICP)algorithm, which uses the same principle as above, to calculate a posterior model given some observations and then we take the most likely shape, i.e. the mean from the distribution as our proposal. To find the corresponding points, we simply estimate this to be the closest point on the target surface. To begin with, we can then assign a large uncertainty value to our observation. The idea is then to iteratively move the model closer to the target mesh, by estimating new corresponding points in each iteration and lowering the uncertainty. To begin with, I will just show you a very simple implementation method that has the same structure as the rigid ICP alignment we saw in Tutorial 2
def nonrigidICP(model: PointDistributionModel[_3D, TriangleMesh], targetMesh: TriangleMesh3D, numOfSamplePoints: Int, numOfIterations: Int) : TriangleMesh3D =
  val numOfPoints = model.reference.pointSet.numberOfPoints
  val ptIds = (0 until numOfPoints by (numOfPoints / numOfSamplePoints)).map(i => PointId(i))

  def attributeCorrespondences(movingMesh: TriangleMesh3D) : IndexedSeq[(PointId, Point[_3D])] =
    ptIds.map( (id : PointId) =>
      val pt = movingMesh.pointSet.point(id)
      val closestPointOnMesh2 = targetMesh.pointSet.findClosestPoint(pt).point
      (id, closestPointOnMesh2)
    )

  def fitting(movingMesh: TriangleMesh3D, iteration: Int, uncertainty: Double): TriangleMesh3D =
    println(s"iteration: $iteration")
    if (iteration == 0) then
      movingMesh
    else
      val correspondences = attributeCorrespondences(movingMesh)
      val posterior = model.posterior(correspondences, uncertainty)
      fitting(posterior.mean, iteration - 1, uncertainty)

  fitting(model.reference, numOfIterations, 1.0)
A ton of configuration possibilities exist for the ICP algorithm, for instance how the closest points are taken, which is calculated in the attributeCorrespondence function. This could be either the closest Euclidean point on a target surface, the closest vertex on the target surface (as done), closest point along the surface normal, we could also estimate the closest points from the target to the model instead, and many more methods exist to make it more robust. The same goes for the uncertainty value, which can either be manually set for all correspondent pairs or we can come up with a way to calculate the uncertainty based on the distance between the model surface and the target surface for each point. In the example, the uncertainty is a standard multivariate normal distribution, but we could also provide different uncertainty in different directions.
When running the fitting, we can either make use of the original model gpmm or we can use the model that is conditioned on the landmark observations.
// Use posterior/conditioned model from landmarks
val icpFit = nonrigidICP(lmPosterior, targetMesh, 100, 50)
// Use complete initial model
val icpFit = nonrigidICP(gpmm, targetMesh, 100, 50)
To evaluate the fit to the target, some common metrics to use are the average distance and Hausdorff distance. These can be used to quickly get an idea about the quality of the fit.
def evaluate(mesh1: TriangleMesh3D, mesh2: TriangleMesh3D, description: String): Unit =
  val avg1 = MeshMetrics.avgDistance(mesh1, mesh2)
  val avg2 = MeshMetrics.avgDistance(mesh2, mesh1)
  val hausdorff1 = MeshMetrics.hausdorffDistance(mesh1, mesh2)
  val hausdorff2 = MeshMetrics.hausdorffDistance(mesh2, mesh1)
  println(s"$description - avg1: $avg1, avg2: $avg2, hausdorff1: $hausdorff1, hausdorff2: $hausdorff2")

evaluate(targetMesh, lmFit, "lmFit")
evaluate(targetMesh, icpFit, "icpFit")
In my case, the output was:
lmFit - avg1: 2.03, avg2: 1.65, hausdorff1: 8.20, hausdorff2: 8.20
icpFit - avg1: 1.81, avg2: 1.22, hausdorff1: 8.67, hausdorff2: 8.67
This means that the average distance improved, but we have a slightly larger maximum distance found. Also, note that the distance from the target to the fit and from the fit to the target might not be the same as internally, the distance functions are using the closest point to decide the point on the opposite mesh.
GiNGR
In its full length: Generalized Iterative Non-Rigid Point Cloud and Surface Registration Using Gaussian Process Regression, is a framework built on top of Scalismo which implements some more sophisticated ways to perform non-rigid registration. And full disclosure, I’m one of the maintainers of the repository which is based on my PhD. thesis. The main principles behind the GiNGR framwork are exactly what we went through in the manual example that we coded up. We need to select a deformable model for the fitting, then we need to decide how the corresponding points are being estimated in each iteration and finally, we need to set the observation uncertainty.
The framework already comes with multiple different examples of how to perform fitting, but also automatic methods to calculate the models. In the prepare_data/03_registration.scala I’ve made use of the GiNGR framework where I make use of the Coherent Point Drift implementation.
This method is very good in correcting minor rigid alignment offsets between the model and the target as well as giving a coarse fit to the data. As our data is very noisy, I’m already stopping after the coarse fit, as we would otherwise just start explaining the noise in the data with our model.
But let’s try to run the examples from the GiNGR repository, to get a feeling for how it can be used to fit very close to the target mesh. For this, let’s look at the MultiResolution demo. This demo first solves a small rigid offset in the target mesh as well as giving a rough fitting using the Coherent Point Drift implementation. Notice how we use runDecimated instead of run, internally, this method will decimate both the model and the target mesh to speed up the fitting. In the second step, we use a less decimated model, still using the same fitting method. Finally, we switch to the Iterative Closest Point algorithm, as explained at the start of this tutorial, where we do an additional step with the full resolution to fit all the intricate details in the mesh.
The average distance and max distances after each step:
  STEP 1 - average2surface: 1.76 max: 9.31
  STEP 2 - average2surface: 0.57 max: 5.92
  STEP 3 - average2surface: 0.21 max: 5.25
By no means are all of these steps necessary in all cases. Always start with a simple model and one of the methods and try to identify what areas can be improved. Also, if speed is not an issue, you can of course skip decimating the meshes and just use the complete meshes.
If you would like to know more in detail about the technical aspects of GiNGR, we’ve also put out a white paper, which you can find on arXiv.
And now, finally, when we compute the fits of all the items in our Vertebrae dataset, we can refer to tutorial 1 on how to calculate our statistical shape model.
And that’s the end of the practical steps to create your first statistical shape model. The most crucial part is to look at your data and from there, decide how e.g. the kernel parameters need to look as well as the noise assumption during the fitting stage. If the dataset is very noisy, it does not make sense to create a model with thousands of basis functions that can perfectly fit the data. And likewise, if you have perfectly clean data, you need to add enough basis-functions to your model for it to be able to describe the data in detail. Also, remember to look at the official Scalismo tutorial on Model fitting.
The remaining tutorials are focused on model evaluation and different ways to visualize your created statistical models.
In the next tutorial I’ll go over:
- Typical evaluation metrics are used to evaluate your statistical shape model.